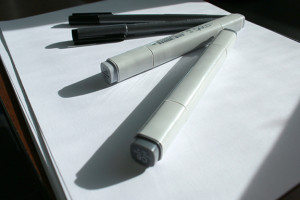
“Rumors of my demise are greatly over exaggerated” is not only a famous quote (Mark Twain) and song lyric (Rise Against the Machine), it also accurately describes the state of markers as a tool in the product development and design industry. Long gone are the days when painstaking hours were spent on full color, hand-drawn marker renderings (thank goodness!). However, I propose marker usefulness on a daily basis has not diminished. Here are just five reasons to not write off this somewhat archaic technology:
- Intentionally Imprecise: A chisel or wide
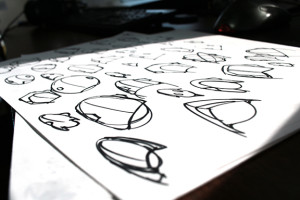 tipped sharpie is a great tool for quickly exploring a basic overall shape without getting caught up in details that aren’t yet pertinent. Our industry is detail oriented, and yet large markers can force you to be intentionally vague, work quickly, redirect focus to the 10,000 ft. view, cover ground and experiment with very few consequences. Fail quick, fail often and move forward more informed.

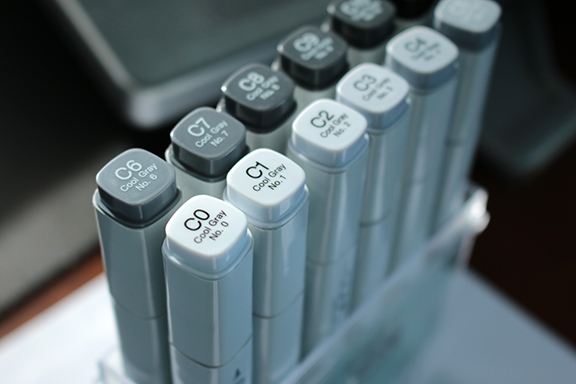
- Line Weight: This single attribute is often
 what separates a great looking sketch from a less successful version. Thickness of lines is one of the quickest methods to show depth: is the line the closest one to the ground? Thick. Is the line a significant edge not attached to the bottom? Medium. Is the line an interior or contour line? Thin. Yeah, there are nuances to these rules, but if you’re not already using them, these simple guidelines will take your sketches to a whole new level. One thin pen, one medium, and one thick marker and you are in business.

- Depth: Low fidelity sketches are generally the next step after loose thumbnails. Photoshop brushes and masking can absolutely get the job done well, but they also require scanning your linework, color balancing etc. If getting the basic surfacing ideas across quickly is the most important goal, then contour lines are useful, but can quickly become distracting. By contrast, two gray scale markers in different values (20% and 50%, or 30% and 60%) can quickly add significant depth to any linework in less time than it would take to even prepare a file for digital shading.
- Color Exploration: There’s no need to own
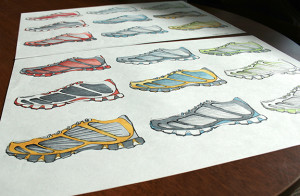 a 72 pack with 7 shades of orange, but a basic 12 color set can be very handy to have on your desk. Say you’re are working on a water bottle and already have the general shape worked out in analog or digital formats… Scan the original sketch, duplicate, arrange in neat organized rows, and print it out. What does it look like in blue? How does a green grip affect the overall value or impact? You are only seconds away from finding out! This process is a great tool for building consensus at a design review, as everyone can quickly have a say, and there’s less “what if” conjecturing.

- Simplicity: Have you ever tried to drag
 a giant drawing tablet or computer to the airport, on a bus, or even home from work in the evening? While being amazing tools, portability is a distinct drawback. Digital sketching and rendering absolutely have their advantages, but when I can grab some pens, markers and paper, sit down on a flat surface – anywhere in the world – and problem solve a design that others can visually understand in minutes, that’s a distinct advantage, and a force to be reckoned with.

Although the tools of product design continue to evolve in this increasingly digital world, don’t shelve those Prismacolor or Copic markers just yet. You may never do a 6 hour rendering by hand again in your life, but don’t dismiss an incredibly useful tool entirely just because it’s a little antiquated. If nothing else, at the end of the day, analog tools will never run out of battery power…. which is more than we can say about too many products in our daily lives.
Kirk Turner is an Industrial Designer, and has been bringing his brand of expertise to the Salient Team since 2015.
Process Practice Makes It Perfect

If you want to be good at basketball, it’s likely you’d spend hours dribbling, working on your layups, and shooting three pointers. Chances are, you wouldn’t go out to play only on Game Day when it’s all on the line, and hope for the best. Personally I’m not much of a ball-sports guy, but the analogy works.
Here at the Salient Soft Goods Department, we stay pretty busy with client projects on a daily basis, but unfortunately, much of that work cannot be shared with the public. Many of the staff members, including myself, still try to make time to keep our skills sharp through continued practice in personal projects. My most recent project is a classic soft goods item: the backpack. Here are some of the individual steps – lets walk through them together.
1.  Defining a set of goals, styles, influences and attributes is a great place to start. These items can really help inform the projects direction, feel, and vision; and they can be used as a benchmark for individual questions and construction details later on.

2. A mood board or inspiration sheet allows you to examine different industries, specific materials, and any other items you might feel compelled to draw creativity from.
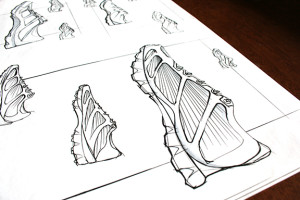
3. Sketch, sketch, sketch! I chose to focus on angular planes and shapes with rounded aspects dispersed throughout.
4. Define the basic dimensions. This can be done with paper/cardboard or computer programs – if you have access and knowledge.

5. Illustrate, define panels and construction details, pattern, and prepare to start fabrication. Alignment notches are your friends – use them! Patterning is an art in and of itself.

6. Gather materials and hardware. Local sources will have some items and can be a good start point, however, unless you have access to a specialty retailer, the internet might be the easiest place to purchase more technically oriented materials.
7. Cut and prepare materials. Laser cutters are amazingly accurate and fast tools, but good ol’ scissors have served well for many years prior to fancy, modern equipment.
8. Work backwards. Some seams and operations need to be done before others, and there is often a defined sequence that needs to be considered and worked through before sewing can begin.
9. Build. If individual panels or areas did not go as anticipated, they can be rebuilt – you might not need to finish the whole project first. And depending on the situation, you can learn more and push the project forward by learning from your mistakes. Few seams cannot be undone with a seam ripper (even if it is annoying and a step backward).
10. Use the result of all your hard work. First hand observation and testing is the best way to evaluate the overall effectiveness. Is it a good solution to the problem or goal? Evaluate the outcome – the good and bad; what went well, what was tough, what could go better next time – and improve on those aspects!
Document the final results and the process, for yourself and for others. Experiment, modify, and ultimately have fun! Sewing and the world of soft goods is a unique set of skills and knowledge, but the more you practice, the better and quicker projects will move along. Thanks for reading!
-Kirk Turner
Kirk Turner is an Industrial Designer, and has been bringing his brand of expertise to the Salient Team since 2015.
8 Reasons Getting Outside Makes You a More Creative Design Thinker

As a design and engineering consultancy, we feel living in Montana gives Salient a huge advantage in the realm of creativity and creative problem solving. It’s true that inspiration can be found just about anywhere – from backpacks dreamt up on mountain tops, to buildings modeled after crumpled up pieces of paper. However, we believe our energy and insight in the design world is fueled in part by gearing up, getting out, being immersed in and inspired by the details, forms, and colors of the wild, wide-open spaces that make this state so special. Not to mention the amount of hands-on testing and experimenting we get to do in this vast playground we call home!
In addition to funding personal projects with “Salient Initiatives” – which allow us to explore our curiosities in design – Salient offers many opportunities to employees that encourage us to get out and play in powder, take camping trips, and travel the world.
The following are just a few reasons we believe exploring and being active in the outdoors makes you a better design thinker:

Persistence: Try and fail, and try again
The tenant of Persistence is common in all outdoor recreations. As a first time ice climber, tackling the flows with Salient teammates this winter revealed muscles untrained, technique unrefined, and expectations that may not have matched reality. But failing fast, compelling forward, and trying until I physically couldn’t any longer are certainly traits I feel confident about bringing into my creative flow.

Noticing the Unnoticed: Taking time to slow down and zoom in (or out!)
Rock climbing is a big recreational activity for many at our office. As with many outdoor activities, while climbing you are 100 percent engaged, and focused on successfully sticking that next move – tackling one problem at a time. This focus, can bring a unique perspective, as you’re close enough to notice the things that remain unnoticed from a distance, like interestingly shaped pockets, colors, textures, and forms. Being on the rock promotes noticing these things in a different light than if one were to pass the whole rock face on a hike, or zip by on a bike – and can be truly eye-opening. Not only is this perspective inspiring as a designer, it also expands how I view these beautiful elements of nature. In good design, the simple, elegant, sometimes unnoticed details are the things that create a cohesive and complete product. If we can bring the practice of noticing the unnoticed into everyday life, it will surely bring a wealth of inspiration and perspective with it.

Simplify: Less is more
One of the first things we learn as designers is “less is more”! The “Simplify” concept translates seamlessly into lessons learned in the backcountry: bring less stuff. Not only will your outdoor experience be enhanced by forcing you to take in and use your surroundings, it will surely lighten up your pack, creating a more enjoyable hike to your destination. So, embrace the white space, use less text and fewer design elements for greater design-impact. A simpler, more focused, and intentional design often motivates better audience reaction.

Take Risks: Be daring!
Dare to think outside the box, and take the trail less traveled! The feeling while moving into the unknown isn’t always one that’s comfortable, there is often a sense unnerving shivers that flow throughout, and your mind almost always tries to talk you out of it. But taking conservative risks – in design as in adventure – will undoubtedly create a compelling experience that achieves the style-goal set and launches you into a feeling of pure bliss that leaves you wanting more. Rules and process are not absolute in design, but guidelines are there to get you started. Don’t be afraid to occasionally step off trail (when it’s smart), and take risks with your design, and creative thought process.

Propel your Practice: Human Powered
Most activities that are done here in the mountains are human powered. Whether skinning up a mountain to “earn your turns”, or placing cams to make your way up a gnarly crack on the side of a mountain to absorb the view from the top – you’re actively working for a result. The lesson of active work propelling my practice into success is one I find incredibly rewarding. Working hard, setting goals, and practicing your craft relentlessly will not only make you a stronger, faster designer, it will lead you to the level of refinement in your craft you strive for, and earn you the confidence to crush your goals in design, life, and adventuring.

Refresh: Make room in your mind from all of the confining details of everyday life
More room for creativity! Ever feel a little foggy after an average day plowing through your routine? The cure is raising that heartbeat, a bit of fresh air, or a sunset atop the highest point in town. I guarantee it. Gearing up, and getting outside makes you happier – It’s science! When you find yourself in a rut, to fuel your creative workflow sometimes all you need is a playful perspective. The fresh air and views create a great mindset for working through design problems. And when your mind is clear and refreshed, creativity has room to breathe, stretch, and settle into your next thoughtful design.

Turn Problems into Solutions: A positive and optimistic outlook is transformative
While venturing into unknown territory to in this case climb, surely has its benefits, it also means sometimes you get your vehicle stuck in the Kentucky backwoods and don’t have service to call for help… So rather than focusing on the problem at hand, and how unfortunate the situation happens to be. It’s helpful to get creative, stay positive, and makeshift a solution with the items you do have (sticks, debris, your own car mats) to get yourself out of there! The same is useful in design thinking, for example when designing furniture, sometimes toothpicks, popsicle sticks and tape can be your best friends to work through those tricky problems that arise as you try to move beyond the 2D form.

Biomimicry: Inspiration in Nature
“Biomimicry is an approach to innovation that seeks sustainable solutions to human challenges by emulating nature’s time-tested patterns and strategies. The goal is to create products, processes, and policies—new ways of living—that are well-adapted to life on earth over the long haul.” -the Biomimicry Institute
Nature often has solutions to problems present to humans that we have never even thought of, yet they have existed for years. A common approach to implementing these solutions into current products is to observe nature and its patterns, then sketch and develop based on the properties of these natural occurrences.
I know not everyone has national parks and mountain tops in their backyard, but just getting out to the park, the pond, the forest preserve, or your own back patio can make a big difference in your creative design thinking. So, now that you know how to channel these unique experiences into your creative process, I challenge you to find your adventure, get outside and expand your design thinking tool box!

Rebecca Allison is an Industrial Designer at Salient Technologies, Inc. She has a passion for the outdoors and soft goods design. In her spare time, Becca can be found adventuring in the mountains, or dreaming up footwear she’d like to make some day.